This manual covers the use of the Swanky Amp Pro plug-in. You will also find general information about guitar amplifiers and tone building to help you get the most of Swanky Amp Pro.
Click here for a PDF version of the manual.
Download the installer, run it, follow the prompts.
Alternatively, to install the plug-in file directly, download the file and move it into
C:\Program Files\Common Files\VST3.
Download the installer, run it, follow the prompts.
Most audio software on macOS (e.g. GarageBand, Ableton ...) supports the AU plug-in format.
Some 3rd party software might support only the VST3 plug-in format.
Alternatively, to install the AU plug-in directly, download the zip file and extract it inside
/Library/Audio/Plug-Ins/Components/.
In the case of the VST3 plug-in, download the zip file and extract it inside
/Library/Audio/Plug-Ins/VST3/.
Here are some basic steps you can take to get started with a good edge-of-breakup guitar tone in Swanky Amp Pro. An edge-of-breakup tone offers a great foundation on which to build wilder tones.
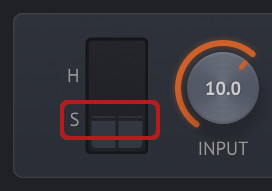
Set the input level:
strum the guitar lightly,
and set the control such that the meter peaks around
S or H
for a single coil or humbucker pickup.
|
|
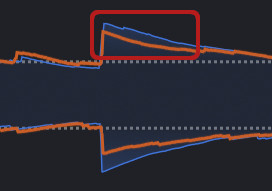
Adjust the pre amp drive:
do some heavy strumming and listen for the attack to sound distorted,
while the ringing out of the chord sounds clean.
If no pedals are loaded,
this should cause the input (blue) signal on the scope to rise above the output (orange) signal momentarily.
|
|
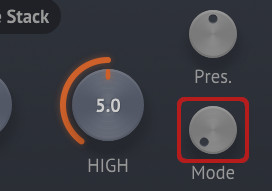
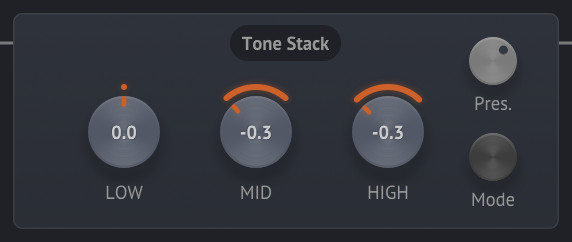
Set the tonestack as desired:
start with the mode control to chose the type of tonestack:
1) Fender-like mid scoop, 2) Marshall-like mid boost, 3) Vox-like bright highs.
Now scoop mid for a clean acoustic tone, or a modern metal tone;
boost mid for an aggressive crunch tone;
boost high for some chime;
or boost low to add some weight to the tone.
|
|
Adjust the power amp drive:
the power amp starts to add nice saturation (and compress the signal) at values around 4.
Pick a note lightly and listen for the compressed attack followed by a saturated swell.
|
At this point you should have a nice edge-of-breakup tone: when you play softly, your guitar sounds clean. But when you hit the strings harder, the amp breaks up giving rise to some very dynamic sounds.
grit and tight knobs in both amp sections to find different distortion soundsstage and filter options to voice the pre amp differently| Toggle on the stereo edit mode. |

|
Add some spread to the tone stack for a subtle stereo effect:
boost the mid and high in the left channel,
and boost the presence in the right channel to balance it out.
|
|
| Add some spread to the drive for a more obvious stereo effect: |
|
You can click here to download the latest factory presets. Or you can delete your presets directory to force the plug-in to re-populate it with factory presets (you should backup your custom presets first). The preset directory can be found by clicking the icon beside the preset selector.
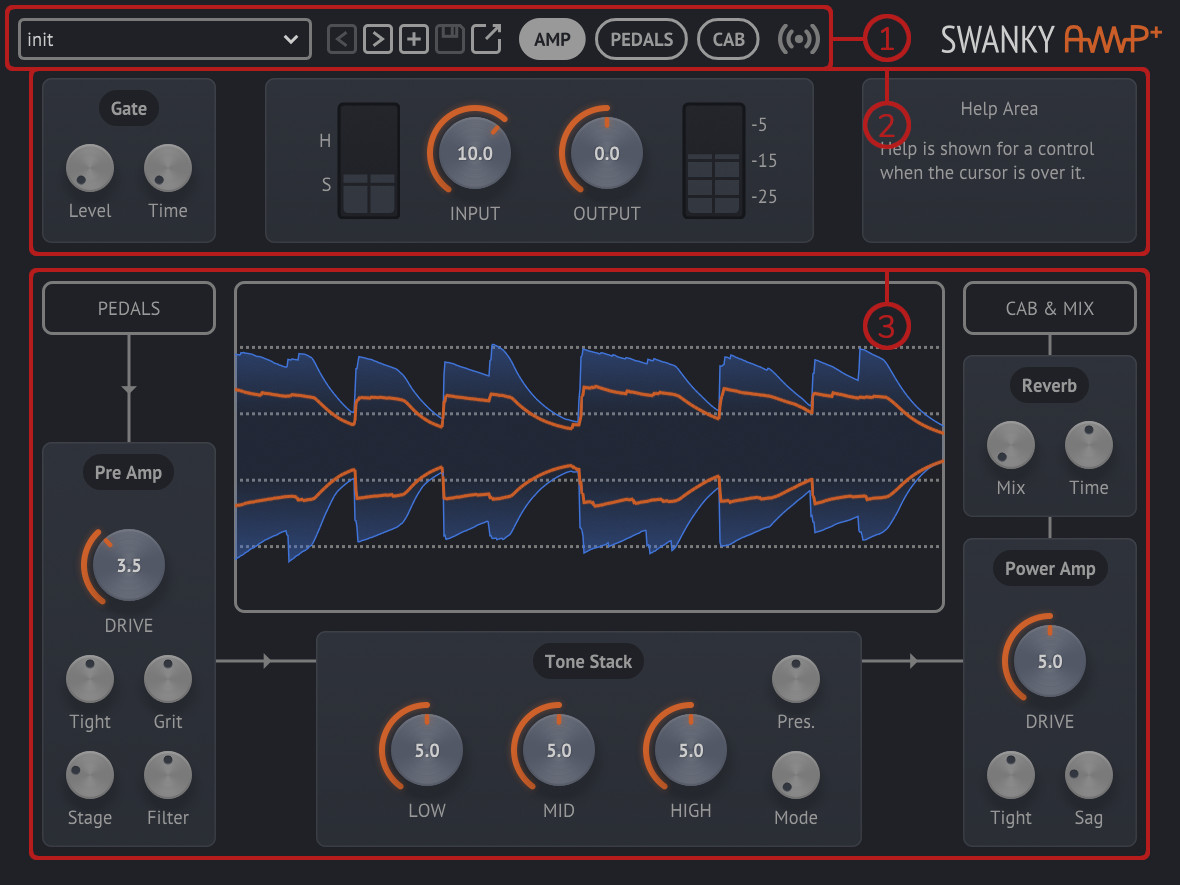
There are three sections to the UI:
The tabs can be selected using the tab buttons in the top bar. The content in the tab area will change accordingly to reveal the controls related to the selected tab. As such, the top bar is always visible to allow navigating between the various tabs.
The controls in the plug-in controls section relate to the plug-in as a whole. As such, those controls are also always visible such that they can be tweaked at any time.
The preset selection menu allows you to select a preset. It displays the name of the currently selected preset.
The buttons to the right function as follows (in order):
load the previous preset,
load the next preset,
create a new preset,
save over the current preset,
open the preset directory.
When creating a new preset,
a dialogue will allow you browse to the desired file location.
When overwriting a preset, a dialogue will ask you to confirm the action.
The presets menu shows you the files in the preset directory. You can make sub-directories in the preset directory, and they will show up as sub-menus.
The input level and cab toggle
parameters are not saved in the presets.
These parameters tend to be global to a session.
For example,
if you switch guitars,
you need a different input level,
regardless of which preset you are using.
The tab buttons allow you to switch between viewing the controls related to the amplifier, pedals and cabinet. The amplifier tab also contains the tone stack, and the cabinet tab also contains the stereo mix controls.
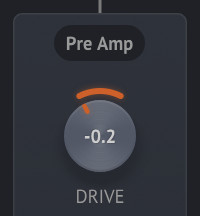
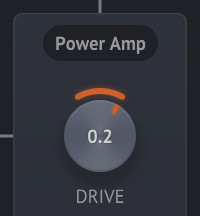
When this button is toggled on, part of its icon turns orange. The UI is then in stereo edit mode.
While in stereo edit mode, the controls change to represent the stereo spread of their corresponding parameter. If a control is centered, its parameter has no stereo spread: the parameter affects the left and right channels in the same way. If the control is moved to the left, the parameter is increased in the left channel, while it is decreased in the right channel, and vice versa.
For example,
when in stereo edit mode,
moving the power amp's drive
to the right adds distortion to the right channel and decreases the distortion in the left channel.
Some controls are greyed out (disabled) when stereo edit mode is toggled on. This means that their parameters cannot be changed independently in the left and right channels.
When adding a lot of stereo spread to some parameters, the stereo mix will sound unbalanced: either the left or right channel will sound louder. This can be corrected in the cab tab, as described in that section of the manual.
The controls shown in this section of the UI affect the overall behaviour of the plug-in.
The noise gate allows you to automatically mute the plug-in when the input signal is quiet. This is used to reduce the noise coming from the guitar in moments when it is not being played.
To use the noise gate,
with the guitar plugged-in and its volume knob turned up,
increase the gate's level until the guitar's hum goes away.
Then play some chords and tweak both the controls to get a good sound.
Leave time between the chords to see if the gate closes too fast,
or if too much noise is heard in those moments.
Increasing the tight control affects how long it takes for the level to climb and drop down once the signal is low.
A small tight value can lead to abrupt changes (even some sawtooth behaviour).
A large tight value can lead to too much noise being heard while the guitar isn't played.
There is a trade-off to be made, and it depends on your style of playing and how noisy is your recording setup.
When the gate's level is at 0,
it is completely disabled.
The input and output controls directly affect the plug-in's input and output levels.
The values are in decibels, and they range from -35 to +35 dB.
It is important to gain stage the input signal before working on your tone.
Strum the guitar lightly
and adjust the input level such that the input meter peaks at either the S or H tick.
Aim for the S tick if you are using a single-coil (or low output) pickup,
and the H tick if you are using a humbucker (or high output) pickup.
If you aren't sure, it's a safe bet just to aim for a peak between the two ticks.
Just as with a real tube amplifier, Swanky Amp Pro's tone depends strongly on the input signal level. If you've got your audio interfaced turned down, and you work on a preset without first setting the input level correctly, you might find that preset sounds completely different later when you've got your audio interface volume back up.
Now you can set the output level to an appropriate value for your situation. Lots has been said about metering, but keep in mind that a guitar signal with drive will usually be fairly compressed, so it won't need as much overhead as something like an acoustic guitar or vocals.
This part of the UI displays tooltip messages about the various controls. The message is shown for a control when the mouse cursor hovers over that control.
The messages are brief, and convey critical information about a control's usage. In a pinch, you can rely on those messages instead of reading this manual. But if you're reading this then that means … never mind.
The amp tab contains the typical controls associated with a guitar amplifier, customization options unique to Swanky Amp Pro and a scope to help you visualize the effect of the amplifier on the input signal.
The scope shows two signals: the input signal in blue, and the output signal in orange. The output signal is normalized such that changing the plug-in's output level doesn't impact it. The input signal is taken after the pedals: changes to the input level and effect pedals will impact it.
With no pedals in the signal chain, when the blue signal is above the orange signal, the amplifier is adding distortion and compression. When the orange signal is above the blue signal, the amplifier is adding sustain. By contrast, when both signals overlap and follow one-another, the amplifier usually sound fairly clean.
In tube amplifiers, there are two sets of tubes used which typically differ significantly: the pre amp tubes and the power amp tubes. Overdriving the pre amp tubes is what typically leads to the crunchier distortion sound. The onset of this distortion is usually abrupt: hitting the strings hard will result in a distorted sound, and as the sound decays, the distortion gives way to a clean tone.
The drive control affects how large is the signal going into the pre amp.
Above some level, the input signal will exceed the tube's overhead room leading to distortion.
The tight control affects the timescale on which the tubes respond to large signals.
This is related to both the tubes and capacitors used in the pre amp.
The grit control affects the amount and sharpness of the tube's overhead.
A higher value for the grit control leads to a quicker onset of distortion,
and a crunchier sound.
The stage control selects the number of pre amp tubes,
and blends between them.
Each tube is voiced differently (the frequency response differs slightly),
so the overall tone of the pre amp can be modified by selecting a different number of stages.
Setting the stage control to the maximum value of 5.1 introduces a cold bias.
This means that one of the tubes clips the signal even when it is small,
meaning that the distortion is more persistent and pronounced.
The filter control affects the amount of low-end removed at each pre amp stage.
The more stages are active, the more pronounced the effect.
This is often called the contour,
and it is common for moders to change this value in physical tube amplifiers.
The tone stack emulates typical equalization circuits in the style of Fender, Marshall and Vox amplifiers.
The particular tone stack style is controlled with the mode control.
Set to 1, the circuit is in the style of a Fender tone stack;
set to 2, it is in the style of a Marshall tone stack;
and set to 3, it is in the style of a Vox tone stack.
In any case,
the low, mid and high
controls add or remove from their respective part of the frequency band.
The exact shape of the equalization depends on the mode.
The lows tend to range in the low 100s of Hz,
the mids range in the low 100s to the low 1000s of Hz,
and the highs tend to include frequencies above 4 kHz.
The presence control boosts or cuts frequencies around 4 kHz.
The Fender tone stack is known for its mids scoop: the mid frequencies are subdued, leading to a cleaner and more acoustic tone. The Marshall tone stack is known for its boosted mids: the mid frequencies are boosted, leading to a more aggressive tone that doesn't clash as much with the bass and drum crash. The Vox tone stack is known for its bright character.
As discussed in the pre amp section of this manual, the amplifier has two sets of tubes which differ significantly. The Swanky Amp Pro power stage is modelled after EL34 tubes in push-pull configuration, going into a transformer. This type of power section leads to a smoother distortion than the pre amp.
The distortion onset is more subtle, leading to compression and what is sometimes called note bloom. Great care has been taken to capture the distortion mechanisms that arise in this configuration, such that these subtle dynamics are well represented in Swanky Amp Pro.
The drive control affects how large is the signal going into the power amp.
Above some level, the input signal will exceed the tube's overhead room leading to distortion.
The distortion can be tweaked with the tight control.
As in the pre amp section,
this control affects how much time it takes for the circuit to recover from dynamic effects.
This has many knock-on effects and the overall change to the tone can't be succinctly explained in this manual;
it's best to experiment with this control and formulate your own opinion about its effect.
In vintage amplifiers,
an effect known as voltage sag occurs when the signal arriving at the power amp is so large that it tries to draw more power than is available.
In this situation, the output level drops a bit before recovering.
This is a form of compression with a unique character,
and it is emulated in Swanky Amp Pro.
It can be configured with the sag control:
increase it to make the effect more dramatic,
or dial it back for a flatter more modern tone.
The tight control also affects the sag recovery time.
Swanky Amp Pro offers a stereo digital reverb as a post effect. It sits in the signal chain between the amplifier and the cabinet, meaning that it acts after the distortion and won't get muddied by overdriven tones.
The reverb is the result of layering a few different reverberation techniques, leading to a full room-like sound. It has been tailored to complement guitar tones, moderately emphasizing to the upper mids.
Swanky Amp Pro can load up to 8 pedals into the signal chain. Since only 4 can fit in the UI, you can switch between two pages of 4 pedals.
Each pedal slot has a drop down menu from which a pedal can be selected.
The same pedal type can be used in more than one slot.
The pedal in a slot can also be swapped with the pedal in an adjacent slot using the left and right buttons.
Once a pedal is loaded into a slot,
its controls will be shown alongside generic pedal controls:
the mix and the output controls.
The mix control mixes the pedal's output with its input signal.
This way,
for any effect pedal,
you can dial in the strength of the effect by tweaking the mix.
The output control changes the pedal's output level.
This allows you to do gain staging between the pedals.
The compressor pedal is loosely based on the CS-2. It acts somewhere between a compressor and a limiter, and can be very audible.
Strum some chords and turn down the threshold control until the louder parts of the strumming are noticeably quieter.
Then, compensate for the volume reduction with the output control.
Tweak the tight control until you get a satisfying effect.
Small values will reduce the attack and can help to control very dynamic playing.
Large values will lead to a pumping sound and can be used to follow the musical beats.
The boost pedal is a very simple clean boost with no additional saturation.
It boosts, or cuts, the signal around some frequency which is selected with the frequency control.
The strength of the boost or cut is changed with the boost control.
The chorus pedal is loosely based on the CE-2. It uses similar equalization and the same triangular LFO signal. The chorus effect delays the signal by a variable amount of time which is controlled by the LFO. That delayed signal is mixed back with the original signal.
The rate control affects the LFO rate.
Low rates create a more ambient washing sound.
The depth control affects the amount of delay.
Large depth values are more audible.
This effect can be quite overpowering,
so the mix control should be used judiciously.
The green overdrive is based on the Tube Screamer circuit. The Tube Screamer's op-amp has been modelled, and the effect's circuit follows the same soft clipping and tone shaping as the Tube Screamer.
The drive control affects the strength of the effect's distortion.
It also has an impact on the tone shaping.
The tone control darkens or brightens the tone.
Even at low drive,
this effect is shaping the signal,
boosting the mids and reducing the low end.
The orange distortion is based on the DS-1 circuit. The DS-1's op-amp has been modelled, and the effect's circuit follows the same hard clipping and tone shaping as the DS-1. The DS-1 also employs an interesting transistor clipping circuit which has been modelled in this effect.
The drive control affects the strength of the effect's distortion.
It also has an impact on the tone shaping.
The tone control darkens or brightens the tone.
This effect tends to be overly bright,
so the tone control is usually kept at lower values.
The rodent fuzz is based on the Rat circuit. The Rat's op-amp has been modelled, and the effect's circuit follows the same hard clipping and tone shaping as the Rat.
The drive control affects the strength of the effect's distortion.
It also has an impact on the tone shaping.
The tone control darkens or brightens the tone.
The cabinet in a guitar signal chain has a very big impact on the final tone. The signal output by an amplifier has a lot of harsh and brittle noise in the high frequencies. This gets removed and reshaped by the speaker, cabinet and microphone.
In Swanky Amp Pro, there are three ways you can use a cabinet in your signal chain: you can use the built-in cabinet model and configure it to your liking; you can use the built-in impulse response (IR) loader and load 3rd party cabinet impulse files; or you can disable the cabinet section altogether and load a 3rd party IR or cabinet plug-in after Swanky Amp Pro in your signal chain.
Guitar speaker cones tend to have a strong resonance in the upper mids,
followed by a steep fall off.
The resonance control affects the strength of that resonance.
The highs control moves the frequency of the resonance.
Increase the resonance to get a stronger upper mids boost.
Increasing the highs moves that boost to a higher frequency,
and as a result moves up the frequency at which the speaker cone starts cutting out the highs.
The size control chooses the number and size of the speakers in the cabinet:
the 4x12 option selects 4 speakers with a 12 inch diameter,
whereas the 1x12 option selects 1 speaker with a 12 inch diameter.
The speaker control selects the type of speaker cone.
The back control selects whether or not the back of the speaker is enclosed.
The microphone section allows you to configure the type of microphone and its placement relative to the speaker cone.
The microphone control chooses one of 4 common microphone types.
The position control affects how far to the right of the speaker cone is the microphone placed.
The distance control affects how far back from speaker cone is the microphone placed.
The tilt control affects how tilted is the microphone with respect to speaker cone.
The toggles allow you to select between the 3 modes of operation:
using the built-in cabinet model (C is ON and IR is OFF),
using the built-in IR loader (C is ON and IR is ON),
bypassing the cabinet section (C is OFF).
The stereo section allows you to modify the stereo plug-in's final stereo image.
The balance control affects the relative level of the left and right channels.
Setting the balance to 0 will mute the right channel, and setting it to 10 will mute the left channel.
The width control affects how much of the left and right channel get mixed together.
With width set to 0, the left and right channels are added together and the plug-in is outputting a mono signal.
At a value of 5,
the left channel gets 50% of the right channel added to it and vice versa.
At a value of 10,
the left and right channels are not mixed at all.